Advanced setup
Last edited on November 30, 2022Clef is a signer and account management tool that is external to Geth. This means it can be run as a separate process or even on a separate machine to the one running Geth, for example on secure hardware that is not connected to any external network, or on secure virtual machines. This page describes how Clef can be used with Qubes OS to provide a more secure setup than a normal laptop. Using Clef with USBArmory hardware is also briefly described.
Qubes OS
Background
The Qubes operating system configures a set of virtual machines for different purposes such as:
- personal
- Your personal email, browsing etc
- work
- Work email etc
- vault
- a VM without network access, where gpg-keys and/or keepass credentials are stored.
A couple of dedicated virtual machines handle externalities:
- sys-net provides networking to all other (network-enabled) machines
- sys-firewall handles firewall rules
- sys-usb handles USB devices, and can map usb-devices to certain qubes.
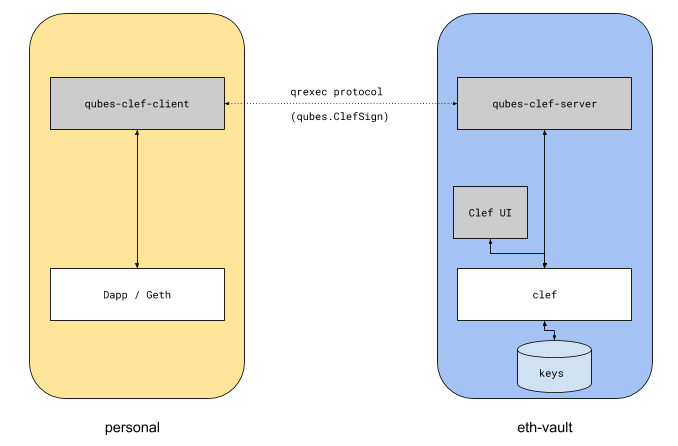
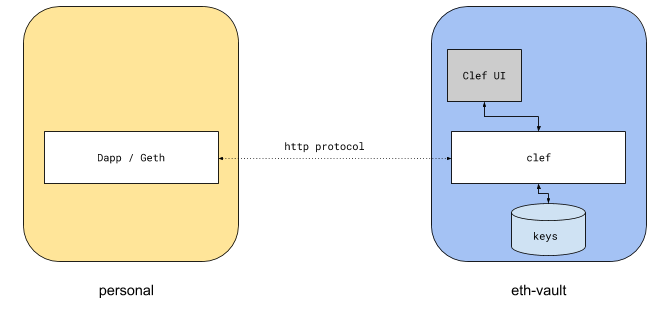
The goal of this document is to describe how we can set up Clef to provide secure transaction signing from a vault vm, to another networked qube which runs Dapps.
Setup
There are two ways that this can be achieved: integrated via Qubes or integrated via networking.
1. Qubes Integrated
Qubes provides a facility for inter-qubes communication via qrexec. A qube can request to make a cross-qube RPC request to another qube. The OS then asks the user if the call is permitted.
A policy-file can be created to allow such interaction. On the target domain, a service is invoked which can read the stdin from the client qube.
This is how Split GPG is implemented. Clef can be set up in the same way:
Server {#server}
On the target qubes, we need to define the RPC service.
#!/bin/bash

SIGNER_BIN="/home/user/tools/clef/clef"
SIGNER_CMD="/home/user/tools/gtksigner/gtkui.py -s $SIGNER_BIN"

# Start clef if not already started
if [ ! -S /home/user/.clef/clef.ipc ]; then
	$SIGNER_CMD &
	sleep 1
fi

# Should be started by now
if [ -S /home/user/.clef/clef.ipc ]; then
    # Post incoming request to HTTP channel
	curl -H "Content-Type: application/json" -X POST -d @- http://localhost:8550 2>/dev/null
fi
This RPC service is not complete (see notes about HTTP headers below), but works as a proof-of-concept. It will forward the data received on stdin (forwarded by the OS) to Clef's HTTP channel.
It would have been possible to send data directly to the /home/user/.clef/.clef.ipc socket via e.g nc -U /home/user/.clef/clef.ipc, but the reason for sending the request data over HTTP instead of IPC is for the ability to forward HTTP headers.
To enable the service:
sudo cp qubes.Clefsign /etc/qubes-rpc/
sudo chmod +x /etc/qubes-rpc/ qubes.Clefsign
This setup uses gtksigner, which is a very minimal GTK-based UI that works well with minimal requirements.
Client {#client}
On the client qube, a listener is required to receive the request from the Dapp, and proxy it.
"""
This implements a dispatcher which listens to localhost:8550, and proxies
requests via qrexec to the service qubes.EthSign on a target domain
"""

import http.server
import socketserver,subprocess

PORT=8550
TARGET_DOMAIN= 'debian-work'

class Dispatcher(http.server.BaseHTTPRequestHandler):
    def do_POST(self):
        post_data = self.rfile.read(int(self.headers['Content-Length']))
        p = subprocess.Popen(['/usr/bin/qrexec-client-vm',TARGET_DOMAIN,'qubes.Clefsign'],stdin=subprocess.PIPE, stdout=subprocess.PIPE)
        output = p.communicate(post_data)[0]
        self.wfile.write(output)


with socketserver.TCPServer(("",PORT), Dispatcher) as httpd:
    print("Serving at port", PORT)
    httpd.serve_forever()
Testing
To test the flow, with debian-work as the target:
$ cat newaccnt.json
{ "id": 0, "jsonrpc": "2.0","method": "account_new","params": []}

$ cat newaccnt.json| qrexec-client-vm debian-work qubes.Clefsign
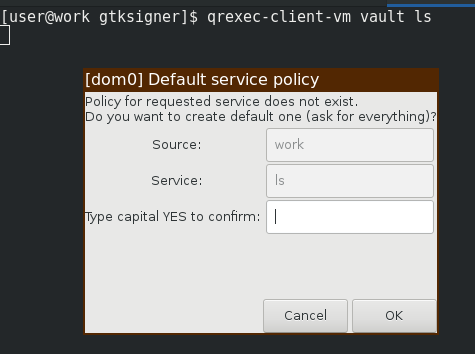
A dialog should pop up first to allow the IPC call:
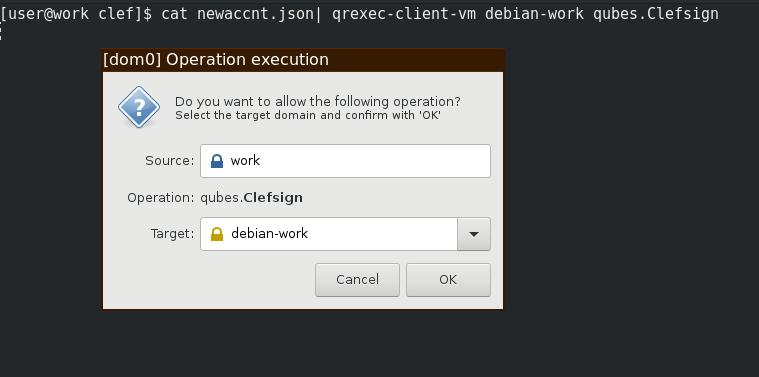
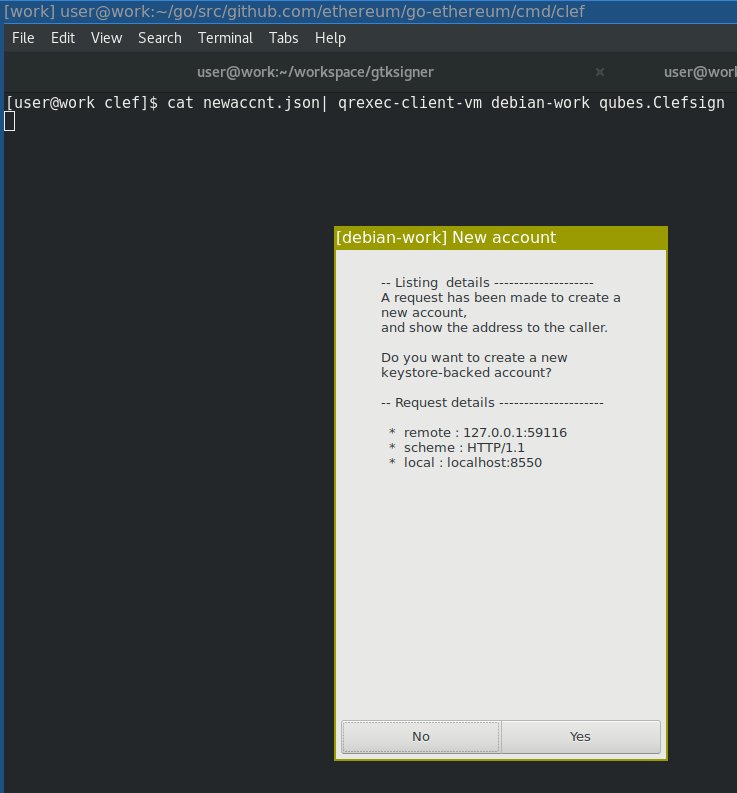
Followed by a GTK-dialog to approve the operation:
To test the full flow, start the client wrapper on the client qube:
[user@work qubes]$ python3 qubes-client.py
Make the request over http (client qube):
[user@work clef]$ cat newaccnt.json | curl -X POST -d @- http://localhost:8550
And it should show the same popups again.
Pros and cons {#pros-and-cons}
The benefits of this setup are:
- This is the qubes-os intended model for inter-qube communication,
- and thus benefits from qubes-os dialogs and policies for user approval
However, it comes with a couple of drawbacks:
- The qubes-gpg-client must forward the http request via RPC to the target qube. When doing so, the proxy
will either drop important headers, or replace them.
- The Host header is most likely localhost
- The Origin header must be forwarded
- Information about the remote ip must be added as a X-Forwarded-For. However, Clef cannot always trust an XFF header, since malicious clients may lie about XFF in order to fool the http server into believing it comes from another address.
- Even with a policy in place to allow RPC calls between caller and target, there will be several popups:
- One qubes-specific where the user specifies the target vm
- One clef-specific to approve the transaction
2. Network integrated
The second way to set up Clef on a qubes system is to allow networking, and have Clef listen to a port which is accessible from other qubes.
USBArmory
The USB armory is an open source hardware design with an 800 MHz ARM processor. It is a pocket-sized computer. When inserted into a laptop, it identifies itself as a USB network interface, basically adding another network to your computer that can be used to SSH into the device.
Running Clef off a USB armory means that the armory can be used as a very versatile offline computer, which only ever connects to a local network between the local computer and the device itself.
Needless to say, while this model should be fairly secure against remote attacks, an attacker with physical access to the USB Armory would trivially be able to extract the contents of the device filesystem.
Summary
This page introduced two ways to setup Clef that give additional security compared to running on a normal laptop.